How to Press Flowers: 4 Beginner Methods + Expert Tips
You’ve got a bouquet drooping on the counter, a few wildflowers from a walk, or maybe a corsage from a wedding you want to keep, and pressing them sounds simple—just stick them in a book, right? The truth is, without the right technique, you’ll end up with brown, brittle petals or worse, mold, but whether you’re a beginner or have tried before with mixed results, this guide will help you get crisp, colorful pressed flowers that last for years.
Oldest known pressed flowers: over 300 years old (Herbarium specimens) ·
Approximate drying time (book method): 7–14 days ·
Microwave press time: 30–60 seconds per cycle ·
Best paper for pressing: blotting paper or uncoated newsprint
- Collect flowers when they are dry, not wet.
- Place flowers between sheets of blotting paper or uncoated newsprint.
- Insert the paper sandwich into a thick book.
- Stack additional books or weight on top.
- Store in a warm, dry place.
- Change the paper every 1–2 days.
- After 7–14 days, the flowers should be flat and papery.
Quick snapshot
- Pressed specimens can last centuries if stored correctly (Natural History Museum (curatorial research))
- Moisture is the primary cause of rot and browning (Royal Horticultural Society (gardening education))
- Book method is simplest and most accessible for beginners (First Day of Home (DIY tutorial))
- Exact drying time varies by humidity, flower thickness, and method (Royal Horticultural Society)
- Long-term color retention after fixative sprays is not well-studied for home pressing (Natural History Museum)
- The 3-5-8 rule’s application to pressing is a folk practice, not scientific (Royal Horticultural Society)
- Book method: 7–14 days (Natural History Museum)
- Wooden press: 7–10 days (Royal Horticultural Society)
- Microwave: 30–60 second bursts (First Day of Home)
- Store in airtight containers with desiccant to prevent re-moistening (Royal Horticultural Society)
- Display in frames with UV glass to slow color fading (Natural History Museum)
- Use acid-free paper for long-term storage (First Day of Home)
Seven key facts about pressing flowers, distilled from expert guides: one pattern—moisture control is the single most important factor.
| Fact | Value |
|---|---|
| Oldest known pressed flower collection | Herbarium specimens from the 1600s |
| Recommended drying time (book method) | 7–14 days |
| Microwave pressing time | 30–60 seconds per burst |
| Best paper material | Blotting paper or uncoated newsprint |
| Optimal moisture level for pressing | Fresh but not wet; slightly wilted |
| Flowers to avoid | Thick, fleshy blooms (orchids, lilies) |
| Number of beginner methods covered in this guide | Four (book, press, iron, microwave) |
What’s the best way to press fresh flowers?
The answer depends on your timeline and available tools. Here are four reliable methods, ranked from slowest and simplest to fastest and most hands-on.
Book press method
- Collect flowers when dry, not wet with dew or rain (Natural History Museum)
- Place flowers between sheets of blotting paper or uncoated newsprint (Royal Horticultural Society)
- Insert the paper sandwich into a thick book, then stack more books or a weight on top (Natural History Museum)
- Store in a warm, dry place; change paper every 1–2 days (Royal Horticultural Society)
- After 7–14 days, flowers should be flat and papery (Natural History Museum)
Wooden flower press method
- Layer cardboard, blotting paper, flowers, blotting paper, cardboard, then tighten bolts (Royal Horticultural Society)
- Place in warm, dry area for 7–10 days (Royal Horticultural Society)
- Check after one week; if still soft, re-tighten bolts and wait (First Day of Home)
Iron method (quick pressing)
- Place flower between two sheets of parchment paper (Royal Horticultural Society)
- Set iron to low heat, no steam (Royal Horticultural Society)
- Iron for 15–30 seconds, let cool, then repeat until flower feels dry (Royal Horticultural Society)
RHS warns that if the iron sizzles, moisture is still present—continue drying cycles until the sizzling stops to avoid scorching (Royal Horticultural Society).
Microwave press method
- Use a microwave-safe ceramic tile, parchment paper, and a heavy microwave-safe object (First Day of Home)
- Start with 30-second bursts, releasing steam between cycles (First Day of Home)
- Flowers may scorch if overheated; not recommended for thick blooms (Royal Horticultural Society)
The implication: for beginners, the book method is the safest bet. The iron and microwave methods offer speed but require careful attention to heat and moisture levels.
What this means: beginners should start with the book method to build confidence before trying faster techniques.
Do flowers need to be completely dry before pressing?
No—and trying to press bone-dry flowers can backfire. The ideal moisture level is a happy medium.
Ideal moisture level for pressing
- Flowers should be fresh but not wet with dew or rain (Natural History Museum)
- Completely dry flowers become brittle and may shatter under pressure (Royal Horticultural Society)
- Wilted flowers—slightly limp but not crisp—press best (Royal Horticultural Society)
Why wet flowers rot
- Trapped moisture creates an environment for mold and bacteria (Royal Horticultural Society)
- Paper that isn’t changed soaks through and keeps petals damp (Natural History Museum)
Signs of correct moisture
- Flowers feel supple but not wet to the touch (First Day of Home)
- Paper shows slight dampness after 24 hours—that’s good (Royal Horticultural Society)
The trade-off: pressing too dry loses flexibility; pressing too wet invites mold. The sweet spot is a flower that has wilted for 10–30 minutes after picking.
What are common mistakes in pressing flowers?
Most failures come down to a handful of avoidable errors. Here’s what to watch out for.
Using flowers that are too thick
- Lilies, orchids, tulips, and daffodils have thick tissue that rots before drying (Royal Horticultural Society)
- Succulents like jade or echeveria contain too much water to press whole (First Day of Home)
Pressing flowers that are too wet
- Rain-soaked petals take longer to dry and often discolor (Natural History Museum)
- Mold can form within 48 hours if paper isn’t changed (Royal Horticultural Society)
Not changing paper regularly
- Paper must be changed every 1–2 days to wick moisture away (Natural History Museum)
- Soggy paper leads to browning and mushy petals (Royal Horticultural Society)
Pressing flowers that are fully open vs. buds
- Fully open flowers can lose their shape; buds often open naturally as they dry (Royal Horticultural Society)
- For roses, press at a half-open stage for best results (First Day of Home)
Using too much or too little pressure
- Uneven pressure causes warped or crinkled petals (Royal Horticultural Society)
- A wooden press with adjustable bolts provides the most even force (First Day of Home)
Storing pressed flowers in humid conditions
- Humid storage causes re-absorption of moisture and eventual rot (Royal Horticultural Society)
- Keep pressed flowers in a sealed box with silica gel packets (First Day of Home)
Forgetting to label specimens
- The Natural History Museum recommends recording date, location, and collector (Natural History Museum)
- Labels help track species and pressing date for future reference (Royal Horticultural Society)
Why this matters: most failed pressing projects can be traced to one of these mistakes. Fix these, and your success rate jumps dramatically.
The pattern: attention to moisture and paper changes is the cornerstone of success.
How to stop pressed flowers from rotting?
Rot is caused by trapped moisture. Here’s how to remove it effectively.
Use absorbent paper
- Blotting paper or uncoated newsprint draws moisture away from petals (Royal Horticultural Society)
- Avoid waxed paper, which traps moisture (First Day of Home)
Change paper frequently
- Replace paper every 1–2 days during the first week (Natural History Museum)
- After each change, re-tighten the press to maintain even pressure (Royal Horticultural Society)
Press in a dry, warm environment
- An airing cupboard or conservatory works best (Royal Horticultural Society)
- Avoid basements or garages where humidity is high (Natural History Museum)
Avoid fleshy blooms
- Orchids, lilies, and succulents hold too much water—opt for daisies, pansies, or violets (Royal Horticultural Society)
Store in airtight containers with desiccant
- Once dried, place pressed flowers in a sealed box with silica gel packets (First Day of Home)
- For framing, use UV glass and acid-free matting (Natural History Museum)
The catch: you can follow every rule and still get rot if the environment is too humid. A dehumidifier in the drying room makes a real difference.
What flowers should not be pressed?
Not all flowers are suitable. Some are too thick, too wet, or too fluffy to press well.
Fleshy and succulents
- Jade, echeveria, and aloe are mostly water and rot before drying (Royal Horticultural Society)
Thick-petaled flowers
- Orchids, lilies, tulips, and daffodils have thick tissue that takes too long to dry (Royal Horticultural Society)
Flowers with large, water-filled stems
- Sunflower stems need to be cut thin or removed entirely (Natural History Museum)
Flowers that are fully open and very fluffy
- Dandelions, clematis, and fluffy composite flowers lose shape when pressed (Royal Horticultural Society)
Best flowers for pressing: pansies, daisies, ferns, violets, and roses at half-open stage (Royal Horticultural Society).
Picking the right flower type is the single easiest way to avoid failure. Half-open roses and flat-faced blooms like pansies give beginners the highest success rate (Royal Horticultural Society).
The pattern: success comes from picking the right flower for the method. Thick, wet, or fluffy blooms are best avoided until you have more experience.
The implication: choosing the correct bloom dramatically increases your odds of perfect pressed flowers.
What we know for sure — and what’s still uncertain
Confirmed facts
- Pressed flower specimens can last hundreds of years if stored correctly (Natural History Museum)
- Moisture is the primary cause of rot and browning (Royal Horticultural Society)
- The book method is the simplest and most accessible for beginners (Royal Horticultural Society)
- Thick, fleshy flowers are difficult to press and often fail (Royal Horticultural Society)
- Blotting paper or newsprint is recommended over printer paper (Royal Horticultural Society)
What’s unclear
- Exact drying time varies widely by humidity, flower thickness, and method (Royal Horticultural Society)
- Long-term color retention after fixative sprays is not well-studied for home pressing (Natural History Museum)
- The 3-5-8 rule’s application to pressing is a folk practice, not a scientific guideline (Royal Horticultural Society)
- Whether microwave pressing preserves color better than iron method is anecdotal (First Day of Home)
- The optimal number of paper changes per flower type has not been systematically studied (Natural History Museum)
The catch: these uncertainties mean home pressers should experiment carefully and rely on observed results.
“The best flowers to press are those that are naturally flat, such as pansies, daisies, and ferns. Thick, fleshy flowers like orchids and lilies are much harder to dry successfully.”
— Royal Horticultural Society (Gardening Advice Team), Pressing Flowers and Leaves guide
“Always record when and where you collected the flower, by whom, and, if known, its identity. This turns a simple pressing into a scientific record that could last for centuries.”
— Natural History Museum, London, How to Press Flowers guide
“For the microwave method, start with a short burst and release moisture between cycles. If you skip the resting step, you risk scorching the petals.”
— First Day of Home blog, DIY flower pressing tutorial
For the home gardener, the choice is clear: invest in a proper wooden press or use the book method with daily paper changes, or risk losing your blooms to mold. Pressing flowers is simple, but doing it well requires understanding moisture—not just squishing petals between pages.
chalkingupsuccess.com, woodlarkblog.com, farmhousechicliving.com, youtube.com, redtedart.com
For those without a press, alternative pressing methods offer a practical way to achieve similar results using household items.
Frequently asked questions
How long do pressed flowers last?
If stored correctly in a dry, dark environment, pressed flowers can last for decades. The Natural History Museum notes that herbarium specimens from the 1600s still exist (Natural History Museum).
Can I press wet flowers?
No. Wet flowers trap moisture that leads to mold and browning. Always press flowers when they are dry to the touch, ideally after any dew or rain has evaporated (Royal Horticultural Society).
What is the best paper for pressing flowers?
Blotting paper or uncoated newsprint. Both absorb moisture effectively. Avoid waxed paper, which seals moisture in (Royal Horticultural Society).
How do I press a rose?
Choose a half-open rose. Remove the stem. Place the blossom between blotting paper in a book or press. Change paper daily. The petals may separate slightly as they dry, creating a beautiful layered effect (First Day of Home).
Why did my pressed flowers turn brown?
Browning is usually caused by trapped moisture or oxidation. Ensure you change paper every 1–2 days and press in a warm, dry place. Some flowers naturally darken as they age (Royal Horticultural Society).
Can I press flowers in a microwave?
Yes, but it requires care. Use a microwave-safe tile and parchment paper, and heat in 30-second bursts, releasing steam between cycles. Not suitable for thick flowers (First Day of Home).
Do I need a flower press?
No. A heavy book works well for beginners. A wooden press offers more even pressure and convenience for regular use, but it’s not required (Natural History Museum).
More related posts
 The Rainmaker TV Serie : Sea on 2, Ca t, Streaming Guide
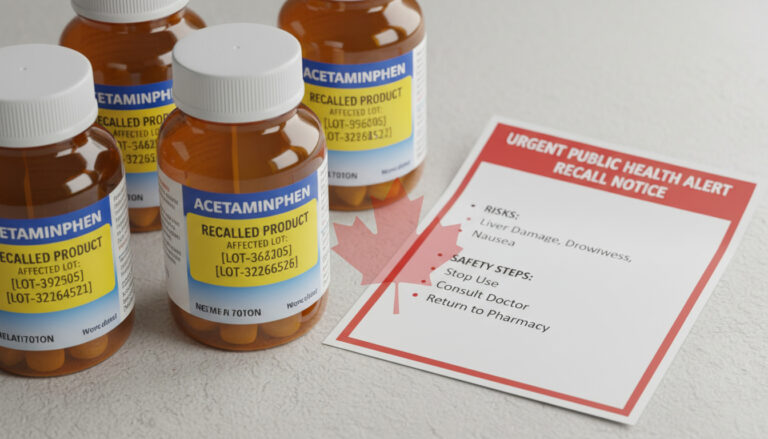 Canada Acetaminophen Melatonin Recall – Affected Lots, Risks and Steps
 Will Trent Season 3: Release Date, Cast, Episodes & Where to Watch
 Avis de décès Journal de Québec: How to Find Death Notices
 52 Inches in Feet – 4 Feet 4 Inches Exact
 Airbnb vs B&B vs Hotel: Meaning, Downsides & Red Flags
 Tallest Man in the World: Records, History & Current Holder
 Where Is Yosemite National Park – Exact Location Map Directions